• Skip to primary navigation
  • Skip to main content
  • Skip to primary sidebar

My New England Seoul

  • About
    • About
  • Adoption
    • Growing up white….kinda
    • My Birth Family Search
      • Home
  • Lifestyle
  • Farmhouse
You are here: Home / Archives for DIY

DIY

Tiny House Part I: Windows and Ceiling Insulation Installed

September 23, 2021 by Christina

New windows in

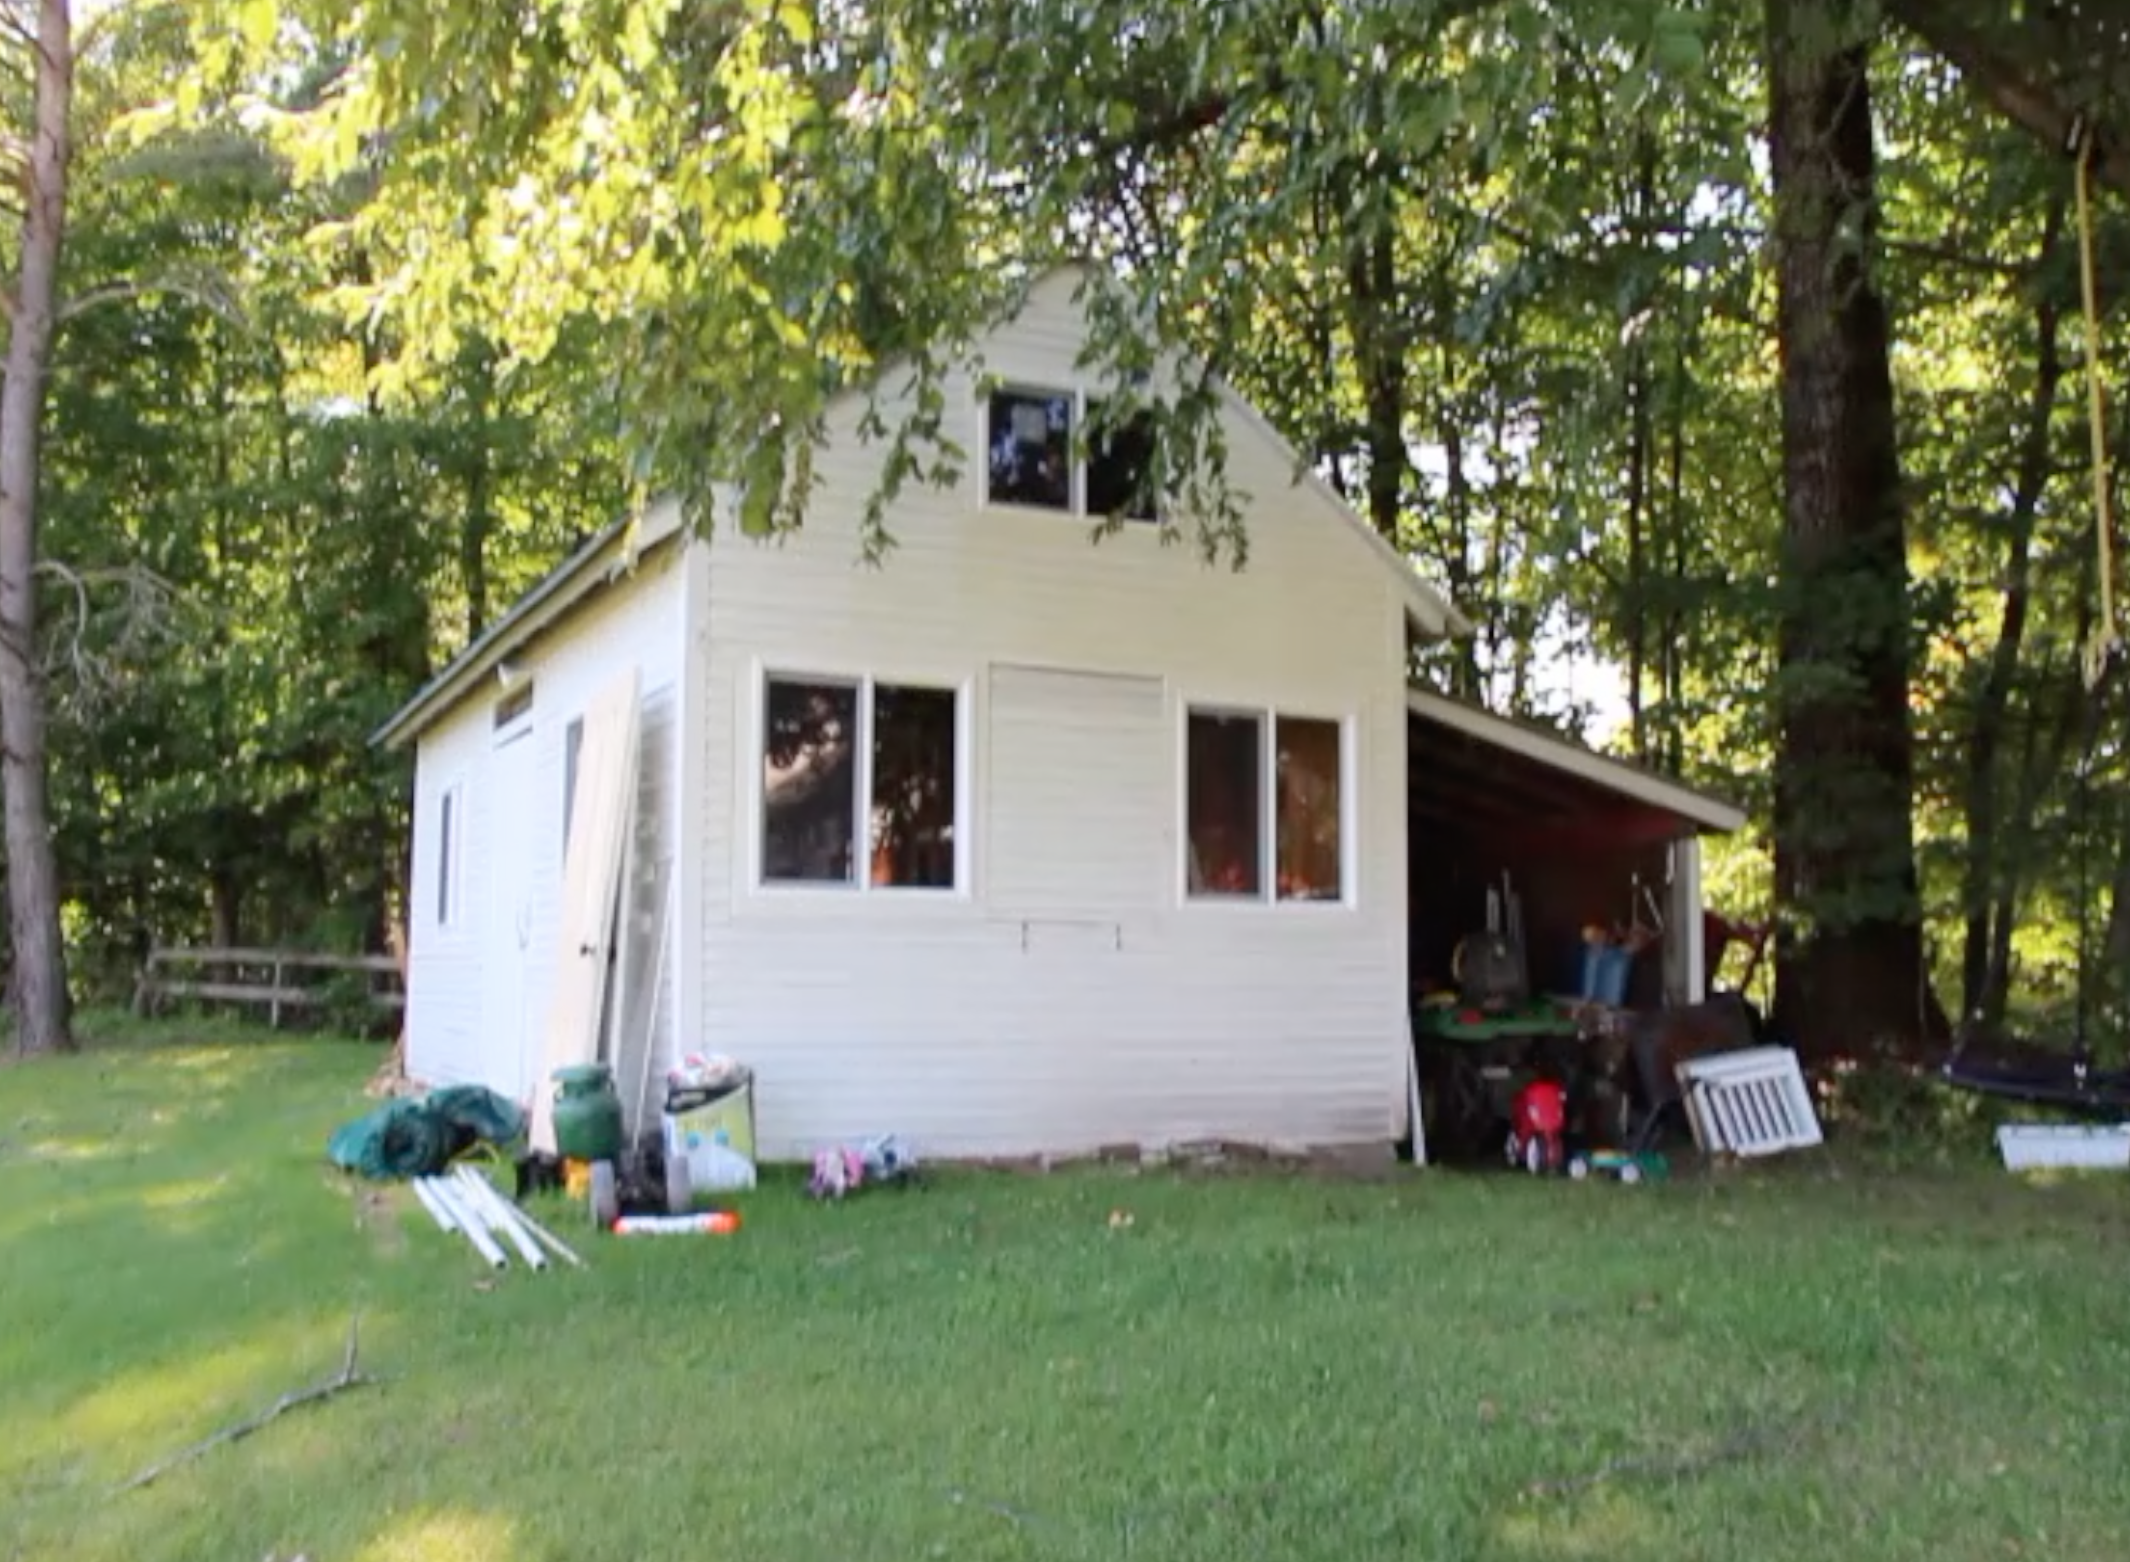
We are about three weeks into our shed to tiny house conversion journey. My husband and I both work outside of the home full time and we have two small children. Our time is limited but nonetheless, good progress is being made.

Tasks Completed:

  • Interior shelving removed
  • Interior beam supports removed to make room for future lofts
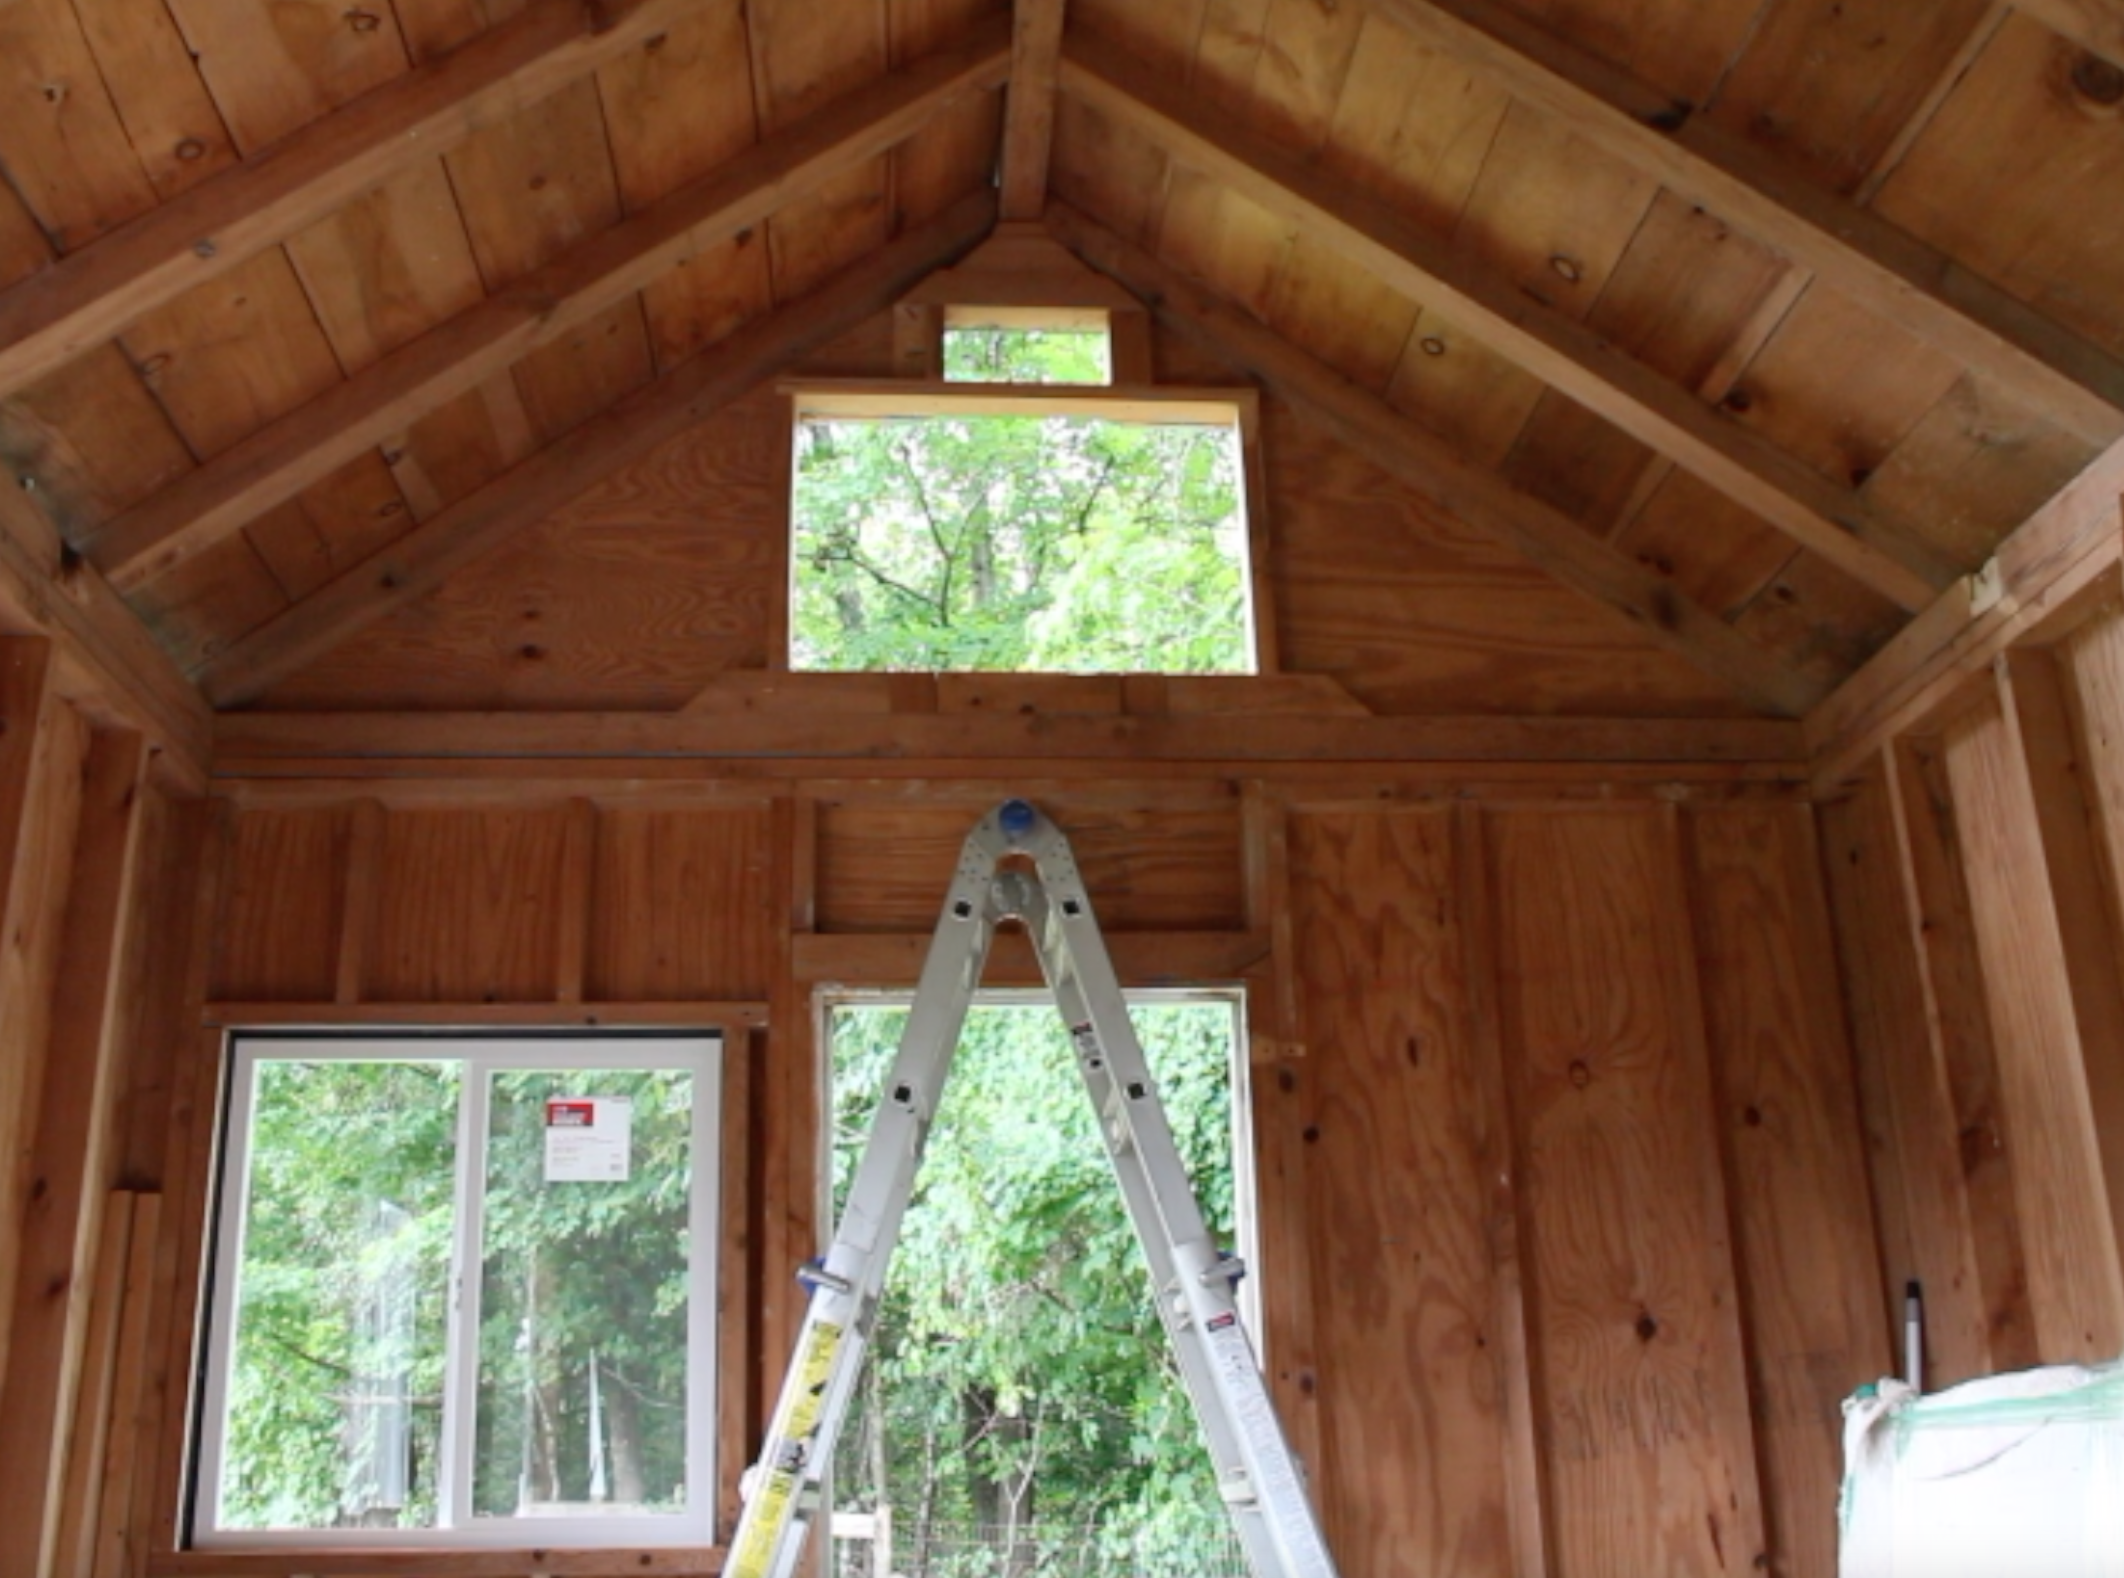
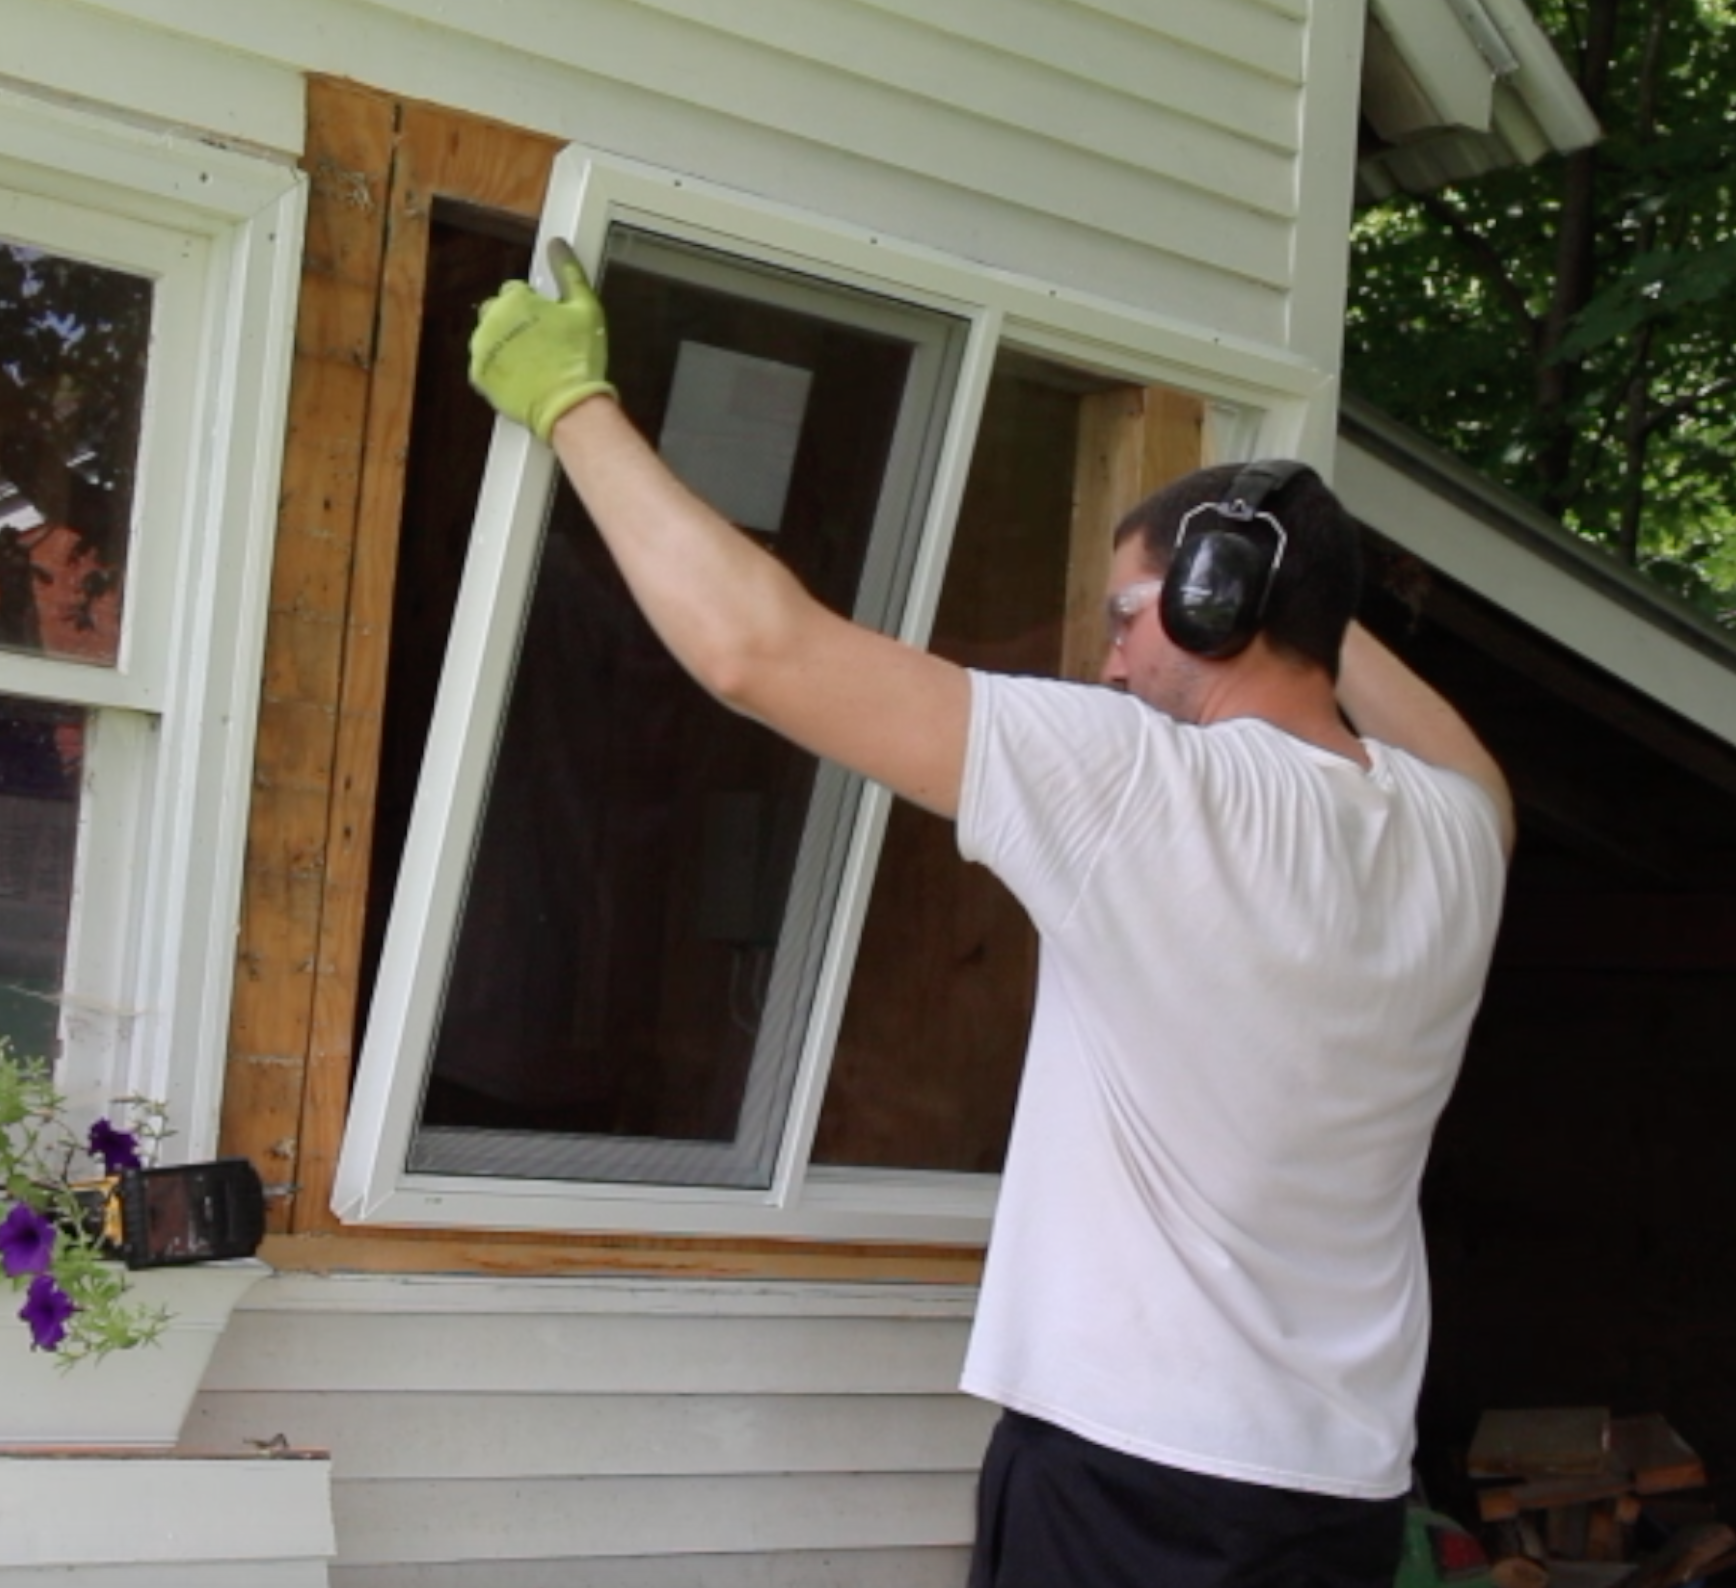
  • Old windows removed and holes patched
  • Old electrical removed
  • New windows installed and weather proofed
  • New trim cut, sanded, painted and installed on exterior
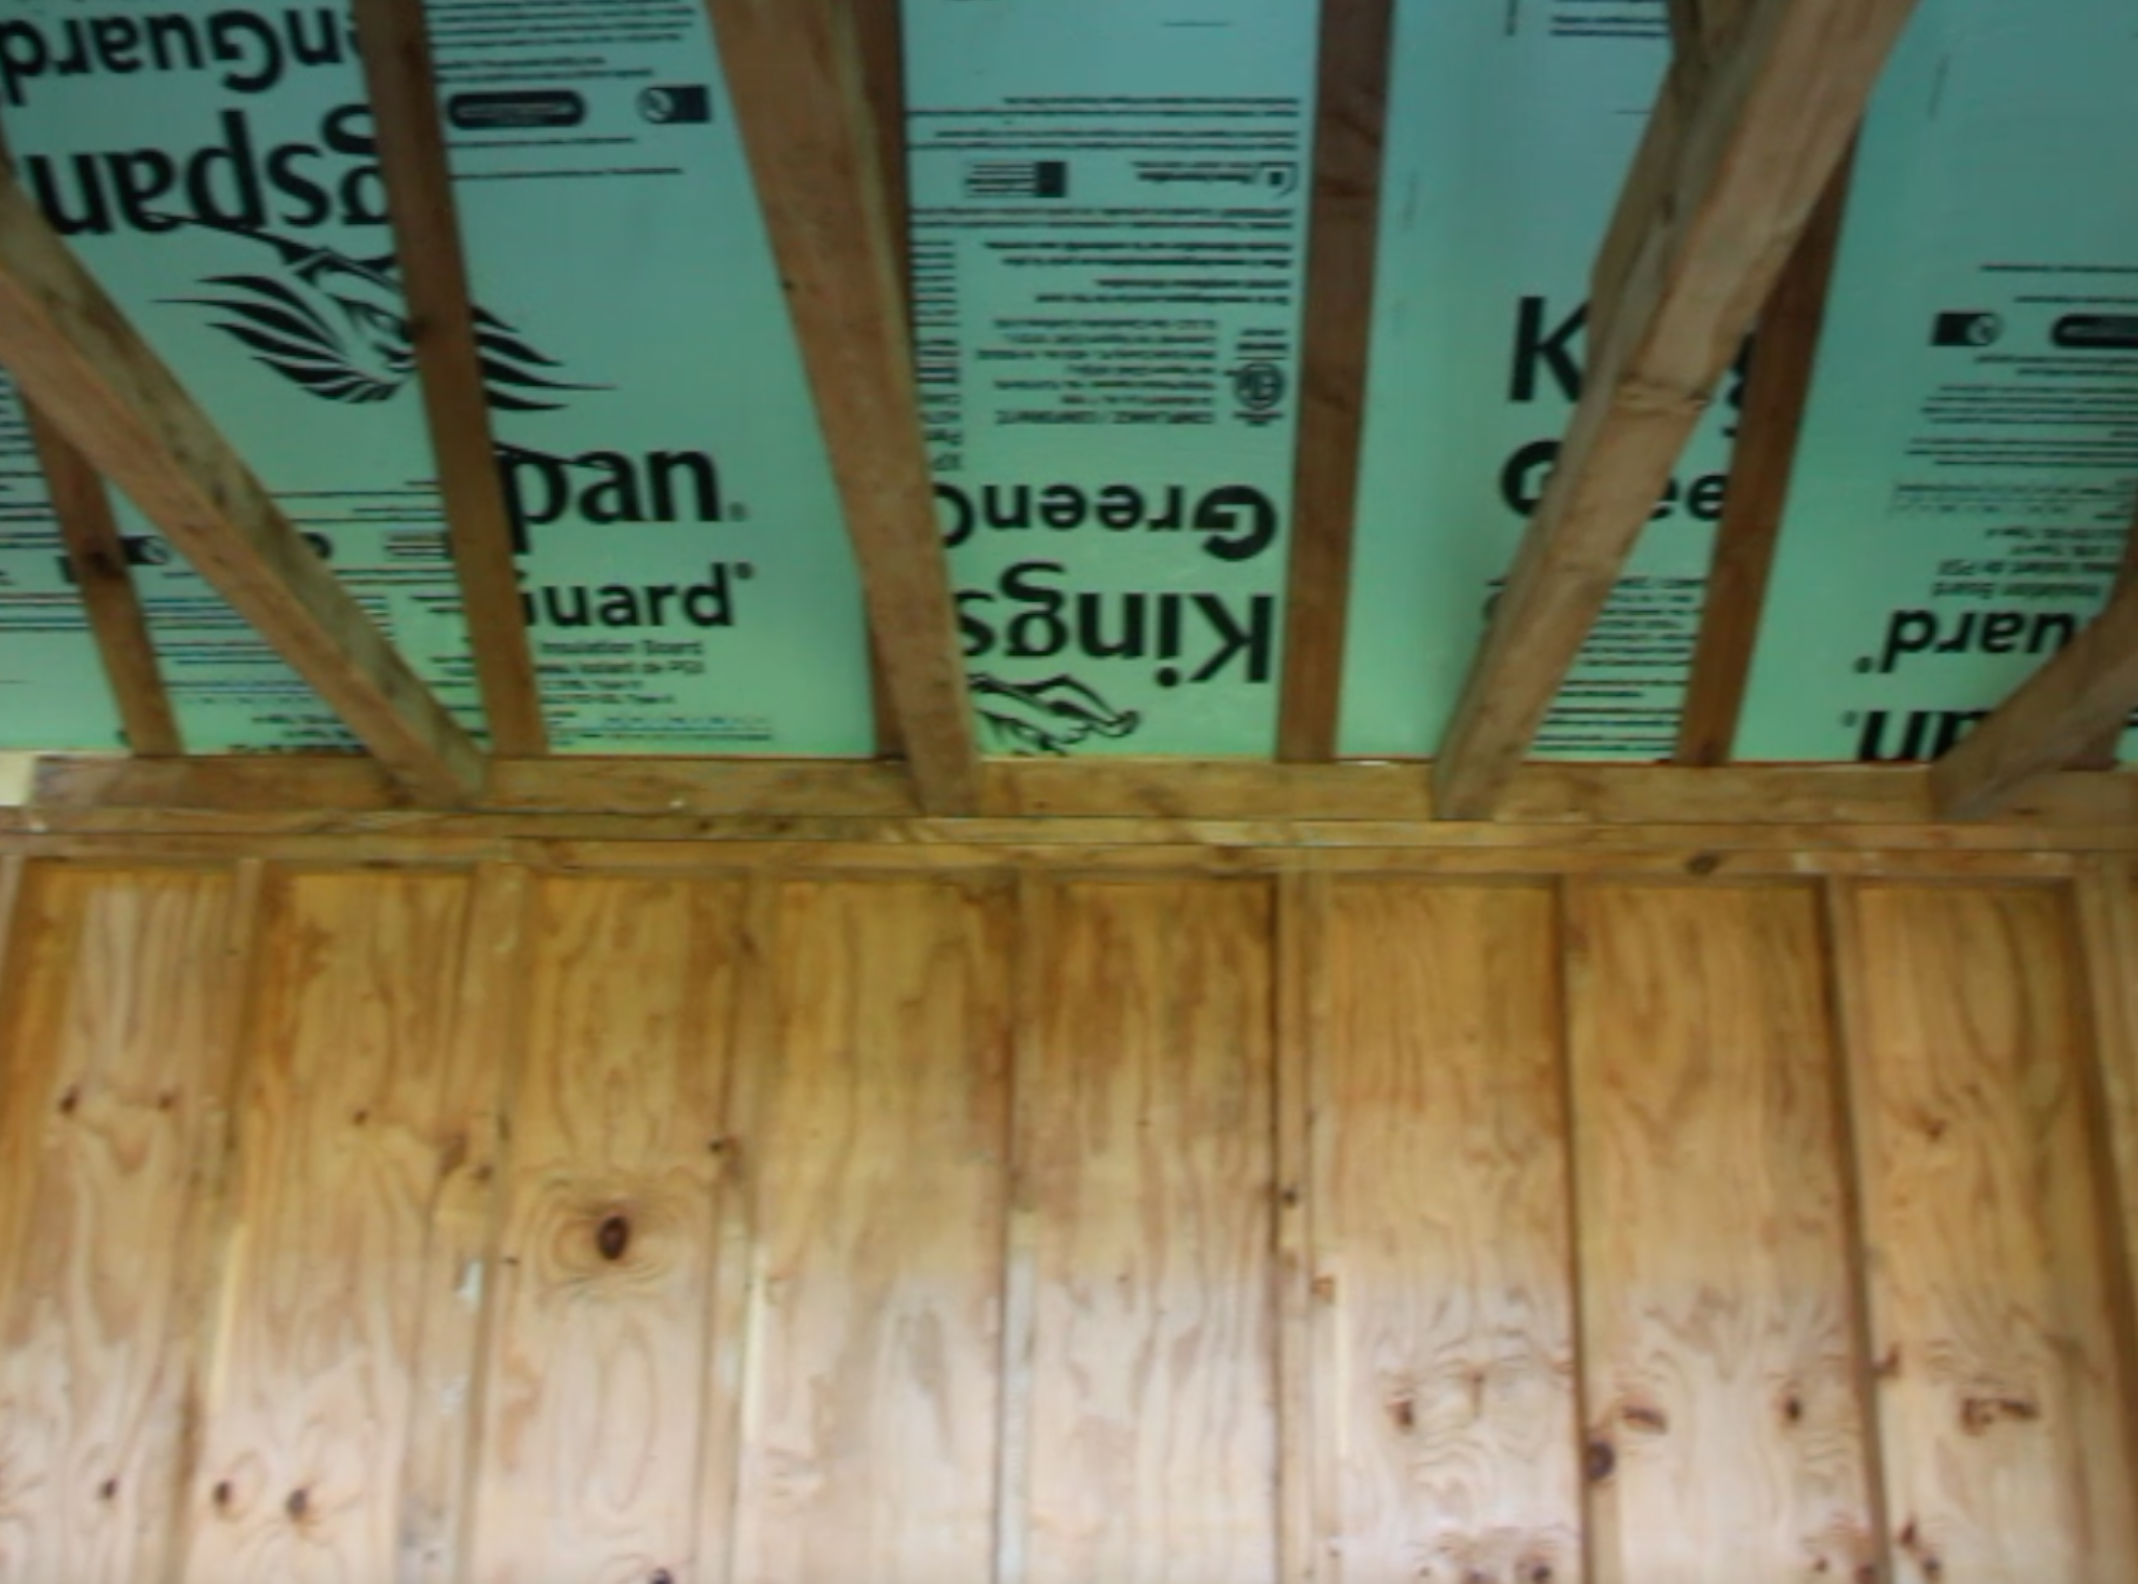
  • Foam board insulation measured, cut and installed between ceiling supports

Total time invested: ~35 hours

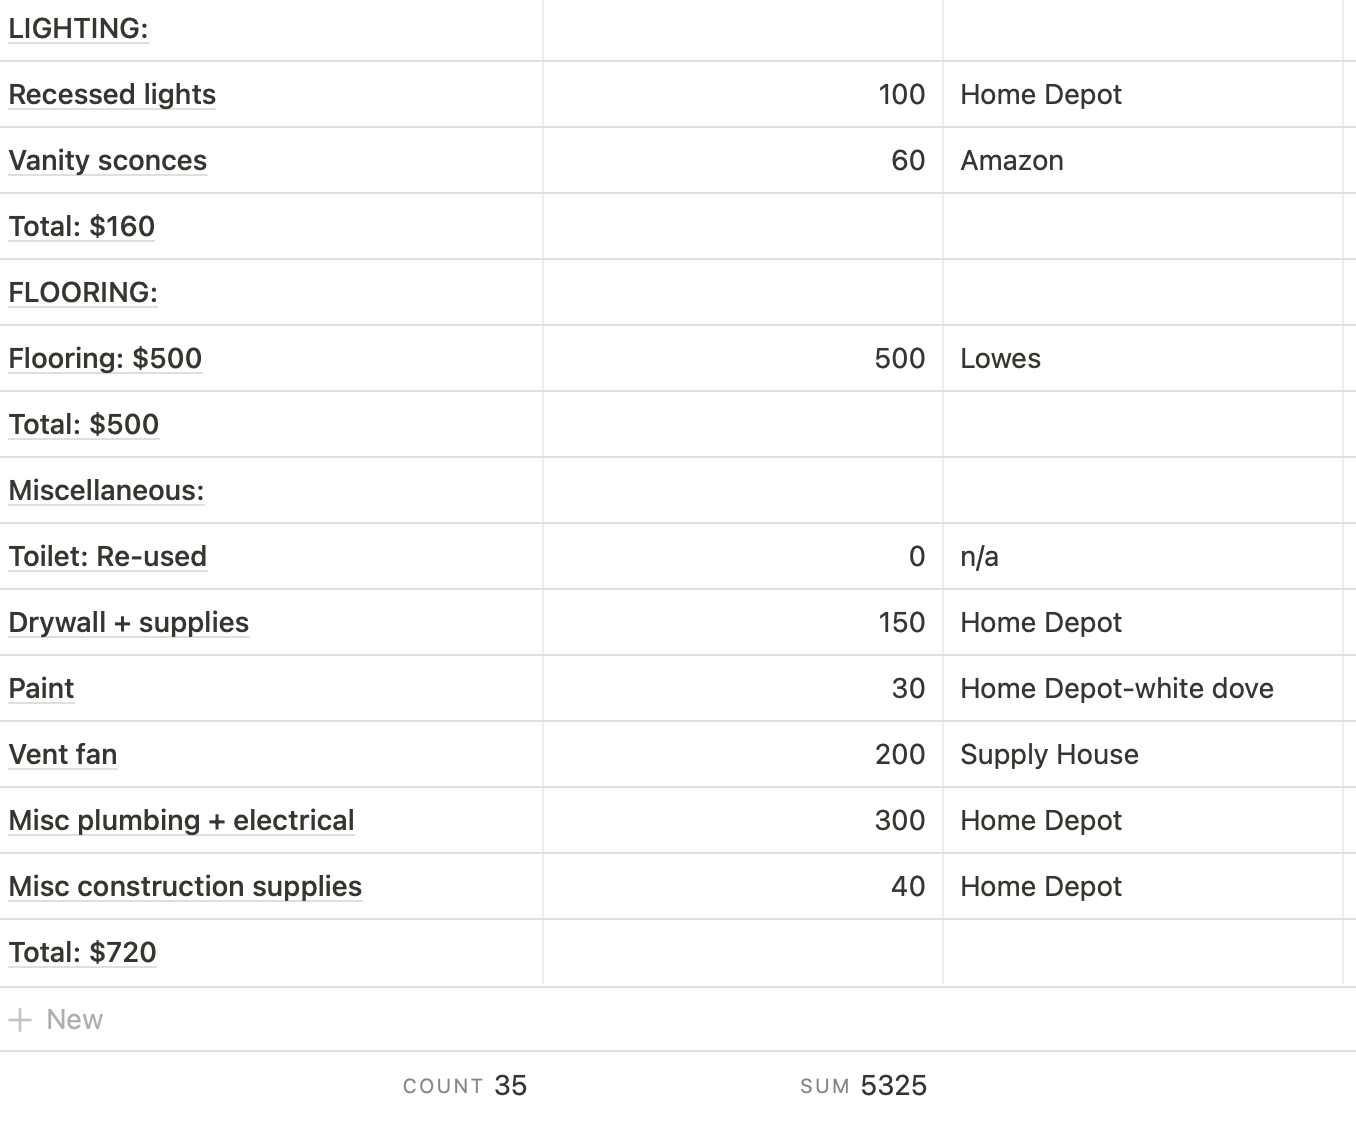
Total cost for materials: $1,270

  • Windows: $620
  • Foam board insulation: $600
  • Flashing tape: $30
  • Caulk/misc: $20

~$10,730 left in budget.

Tools used:

  • Table saw
  • Miter saw
  • Circular saw
  • Oscillating saw
  • Reciprocating saw
  • Orbital sander
  • Drill
  • Caulk gun
  • Compressor
  • Nail gun
  • Ladder
  • Wrecking bar
  • Paint roller
  • Hammer
  • Sledge hammer
  • Wire cutters
Roughing in new windows
In progress
Foam board insulation installed and ready for sheetrock

What’s next?

Next, we are on to roughing in electrical, installing the French doors, and framing for the lofts, kitchen and bathroom.

https://youtu.be/WE9yDnuKvag

Thanks for stopping by!

Filed Under: Tiny house Tagged With: budget, DIY, off grid, shed conversion, tiny house, tiny living

Dramatic Farmhouse Master Bathroom Gut Renovation for under $5500

September 14, 2021 by Christina

Before and After

We bought this home knowing the bathrooms needed total makeovers. After a few ballpark quotes we knew it’d be worth our while to do the work ourselves whenever possible. Luckily, my husband has some experience with construction, plumbing and electrical and I love designing and re-creating our spaces.

Original master bathroom
Small vanity and toilet already removed in this picture but it gives you an idea of the size of the original footprint
Another view of the before
Original bathroom in early stages of demolition

The wall between original bathroom and laundry room was removed exposing the first of many barriers in need of relocation (toilet and small vanity were already removed).

The master bathroom was originally down a hallway behind our master bedroom (picture below). It was sandwiched between a small bedroom (straight ahead in the picture) and the original laundry room (doorway left). Not seen in this photo is immediately left there was the 1st door which is an outside access. This house was built in the early 1800s and has been expanded over the years. In typical old home fashion, the rooms were small, broken up and generally lacking a feeling of flow.

Original hallway behind master bedroom seen above right

This bathroom was the 3rd of four doors in this hallway. The plan was to sacrifice the small bedroom at the end of the hallway (blog post on that coming up) and make it into a large master closet/dressing room that would connect the master bedroom with the new master bathroom.

View from within the new framed out bathroom. Visible is the new staircase opening and new laundry room on opposite side

The new master bathroom footprint would include the original small bathroom, the laundry room and the hallway connecting the two rooms. We also moved the laundry room to the first room and added a new basement access staircase on this side of the house.

The demolition for this project was extensive including four rooms and a hallway. We relocated the washer/dryer as well as the utility sink from the original laundry area (seen above).

This project was much bigger than just a bathroom renovation since it included removing all of the walls separating these rooms as well as adding a staircase to the basement.

Original hallway showing small bathroom and small bedroom (behind open door)

Original hallway

New configuration showing shower half wall and toilet half walls (below)

Progress on custom shower.

Custom shower progress

Soaking tub (not installed)

Flooring going in

New tile flooring

Vanity area (before base installed)

Vanity base

Vanity area with base installed.

Vanity base installed

This bathroom renovation like all DIY projects was a labor of love. I was pregnant with my second child at the time and dreamt of long soaks in my new tub. Like all of our projects I design the space and my husband brings it to life.

The biggest cost saver for this project was obviously the labor as we did it all ourselves. I was 8 months pregnant when we were finishing up so I was of limited assistance toward the end. Other cost savers was making things you would typically purchase like the vanity and the countertops.

Our vanity consisted of a base and framed out shell (pic earlier in this post) and homemade countertops. The cost of wood was about $100 (back when wood was affordable pre-pandemic 2018). My husband made the cabinet doors and the drawer fronts. It’s a simple design but more than meets our needs and looks clean.

Other ways we reduced our overall cost included: re-using the existing toilet, choosing a reasonably priced soaking tub we found on Amazon and modifying items ourselves. For example, the drawer pulls were twice as expensive in the oil rubbed bronze finish compared to a chrome finish. We purchased the chrome pulls and spray painted them the color of finish we wanted and they have worked out perfectly. This is a minor expenditure but each area of savings clearly add up.

Here is the rough cost breakdown and finished pictures below.

NOTE: THESE COSTS WERE BEFORE THE PANDEMIC. THE PROJECT WAS COMPLETED IN 2018. THE COST OF WOOD AND BUILDING SUPPLIES ARE CONSIDERABLY MORE CURRENTLY IN 2021.

After

Soaking tub
DIY towel rack

We are thrilled with the end product. It is a major upgrade from the original bathroom that was there and a very nice space by any bathroom standards.

Thanks for stopping by. More DIY projects to come!

Filed Under: Farmhouse Tagged With: budget, DIY, farmhouse, master bathroom, renovation

  • « Go to Previous Page
  • Page 1
  • Page 2
  • Page 3
  • Go to Next Page »

Primary Sidebar

  • Facebook
  • Instagram
  • Pinterest
  • YouTube

Hi! I’m Christina,

I am a Korean Adoptee with New England Roots! Living and Loving New England Country Life while raising our babies and restoring our 1820s Farmhouse.  Homesteading and Farmhouse Inspiration. Coffee and Tea Lover. Book Addict.

Grab a cup of tea and stay a while!

Recent Posts

  • Korean Adoptee: I lost my mom to Alzheimer’s Disease December 8, 2023
  • Can a baby monitor prevent SIDS? Reviewing the Miku Pro Baby Monitor March 16, 2023
  • Is this the best baby product ever? March 9, 2023

Archives

  • December 2023
  • March 2023
  • February 2023
  • September 2021
  • February 2021
  • January 2021
  • October 2020
  • September 2020
  • May 2014
  • April 2014
  • March 2014

Copyright © 2025 My New England Seoul on the Foodie Pro Theme